Gardenning Topics
Gardenning Topics

Introduction❯Irrigation

Irrigation

Why - an introduction

I used to garden on very free-draining soil and tried to grow somewhat "thirsty" plants such as Raspberries. Then I moved to a garden with a lot of rock and some poor soil. I filled a lot of pots and raised beds and was particularly concerned to be able to go away for a couple of weeks in summer. This meant I had a lot of "waterring points" that needed managing. I soon discovered that regular automatic waterring was getting me great crops.
Supplying and controling the waterThere are two obvious water sources: Whichever source you are using, I recomend having some sort of storage tank. It's possible to connect your irrigation system direct to the tap but you run the risk of a leak leading to a large bill. I use tap water to fill 220L "rainwater" butts under my supervison. It takes quite a few weeks for them to ermpty. As a guide, my 220L corresponds to 37 watering cans full.

Typical Layouts

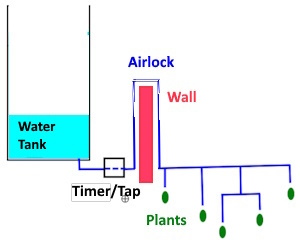
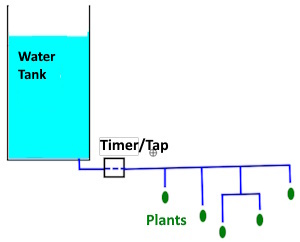
One way of distributing water to the plants is to rely on gravity with a layout like the diagram below:

This only works if the water tank is above all the plants and drippers. It can be reliable provided that no part of the pipework goes above the bottom of the tank.

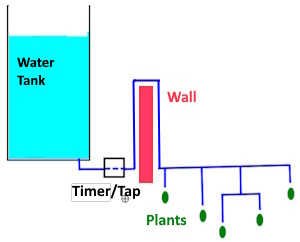
Sometimes, you may want to break the rule about the pipework, like this:

This may work initially but air bubbles are likely to get into the pipework. This may not matter when there is a good head of water in the tank but when the level falls, there won't be enough pressure to blow the bubbles out, an"airlock" will form and flow will cease. Here's a typical scenario:


Once an airlock has formed like this, it might stay in place even when you fill up the tank.  The best way to avoid this problem is to fit a suitable pump (unless you can raise the tank)
 

Control and Timing

Taps

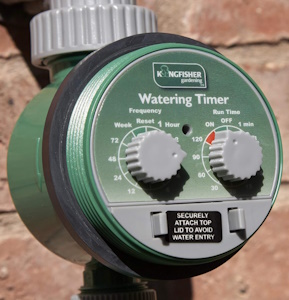
A mechanical or electrically controlled tap between the tank and the irrigation system is useful if you are relying on gravity or mains water pressure to push water through the system to the plants.. I used one like this .

The battery has lasted me some years.  A possible disadvantage of the timer above is that if you want it to let water through at (say) 4 am every day, you have to be physically there setting it going at 4 am for the very first run. (It has no idea what the real time is, it just fires every 24 hours or whatever)

Pumps

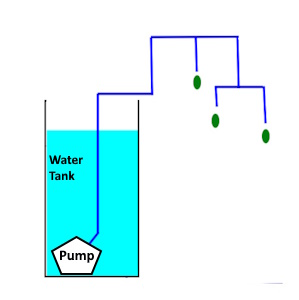
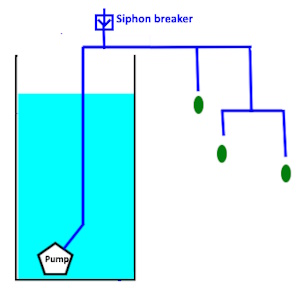
An electric pump may be more convenient to set up and adjust (being to turn them on from your phone when testing or adjusting the irrigation nozzles is pretty convenient) although you'll need to take care to keep some vital parts dry. That said, you can use a submersible pump as I did. The sytem below uses a pump to deliver water to a network above the tank


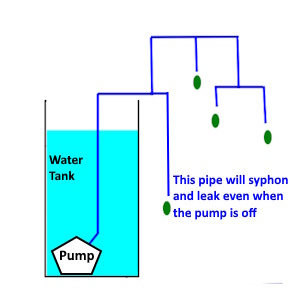
This layout is pretty reliable provided that all the drippers are above the top level of the water in the tank. If you add another outlet that's below the water level, a siphon is likelty to form resulting in a continuous flow of water through that new outlet. It will run even when the pump is off and drain the water tank completely!


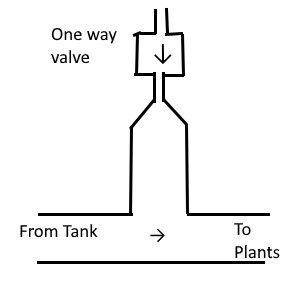
I have a cheap fix for this, a siphon "breaker" made from a T-junction and a one way valve. Here's a diagram:


Siphon-breaker diagram
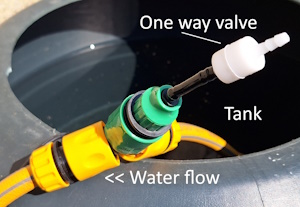
How it works: Here's a photograph
Siphon-breaker photo

I bought the one-way valve for about £5 from Amazon

Here's a digram of where it is fitted

More about pump and siphon-breaker systems

Although your drippers and plants can be above your tank. do check the lifting ability of the pump. EG: I used this pump bought via Amazon which says it can lift water up to 2.8m. However, the mains cable is only 2.5m long so with a really deep tank (say 1.8m) you have enough cable but you can only lift the water to 1m above the top of the tank and the pressure many be pretty feeble
If you use a pump to get water up and out of a low tank to deliver to drippers and plants higher up. you ptobalby don't need a siphon-breaker. That's because siphons can't leak water uphill. One of the effects of a siphon-breaker is that when the pump stops, a lot of the water in the system between it and the drippers will drain out. That means that when the pump starts up the next day, actual irrigation may be delayed while the pipes fill up again. Two important points from this:
Pipes and nozzlesFor most of my experimental systems, I've used flexible black pipe described as 1/4inch.  Kits with sometimes hundreds of parts are widely available online. Here's one I bought from Amazon. Some thoughts about the different parts that may help you choose the right kit for your needs:
T-NozzleSome drippers/nozzles are "inline" - water flows past the nozzle. This simplifies setting up a long line of drippers. However, there are disadvantages:
> You'll probably need something to hold them down in pots
> You may be encouraged to make the line too long and flow at the furthest end may be too little.
Spike nozzle"Fountains" with a long spike built in  are very useful because they are easy to insert into the pot and will stay there. Don't be put off  by the name, you can easilly adjust them to become drippers
Circular dripper"Drippers" can actually deliver a lot of water if adjusted correctly but there's little chance of them giving a spray  which might wet plant leaves. 
T connectorYou need more of these than you think you do! You usually need one for every water outlet at the end of a line. They're also useful for creating a networks with many branches rather than a long line  Water pressure and hence delivery tends to be less at the far end of a line.
Hold-down hooksI don't find these particularly useful; I prefer "Fountains" as shown above. The hooks are fiddly and slide out of the soil too easily. The "Fountains" are easy to assemble and because their spike is thicker, they remain in the ground more firmly.
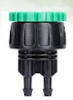
Converter/splitterYou'll probably need to convert from a standard hosepipe size down to 1/4 inch and although you can buy single converters, a double is useful

Last modified: 11 October 2025, 5:20pm